

Let's talk about how to run Logstash on Windows.
This article has been updated for 2019! Here is the link: https://www.dissmeyer.com/2019/04/21/installing-logstash-7-on-windows/
I've been playing around with the Elastic Stack for quite a while now and it is a great tool. Not only is it the search platform for several large companies, it is extremely useful for analyzing pretty much any type of data that you want - like application logs (one of it's non-search use cases).
This article describes the process for how to install Logstash on a Windows workstation or Windows server. The installation concepts for Logstash are the same on both desktop and server however in Windows server you will want to run Logstash as a service (covered at the end). This guide works for Logstash v5.x but will most likely work for future versions as well.
The purpose of running Logstash on a local workstation is for testing filter configurations before adding them to a production Logstash instance. With that being said, there are a few pre-requisites for running Logstash in general:
- Windows fully updated.
- Oracle Java Development Kit v8 (1.8.x) installed. It must be the JDK, not the Java Runtime (JRE).
Most IT pros are pretty new to Logstash so I'll walk through setting up the JDK since there are a few special steps to get it working correctly in Windows.
Configuring JDK in Windows
- Download and install Oracle Java Development Kit v8. Choose all defaults.
- Click Start, search for "Environment Variables" and open the system properties applet. The advanced tab of the "System Properties" applet should appear.
- Click the Environment Variables button.
- Under System variables click "New".
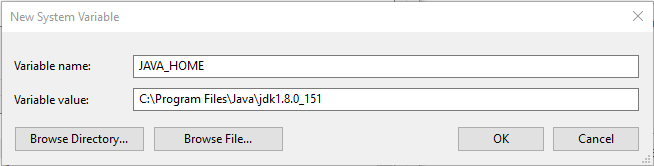
- Enter the variable name "JAVA_HOME" (without quotes) and browse to the JDK install directory and click OK. It will look like this:
The JDK is now installed and good to go. Next, Logstash.
First Time Install and Setup of Logstash
Let's download and install Logstash.
- Download the Logstash ZIP package from here - https://www.elastic.co/downloads/logstash.
- Extract the ZIP contents to a local folder. For this example I will extract the contents to C:\logstash\
That's it! Logstash is installed.... ok well you still need to configure it but it will run. At this point Logstash can be started from the command line or from Powershell.
Running logstash is extremely simple. All that is needed is a config file that contains at least one input and at least one output.
Below is an example configuration to get started. Logstash will accept input from the console as a message, will process it (if a filter is provided), then will output to the console in JSON.
Create a blank file in C:\logstash\bin\logstash.conf.
Use this as a sample to get started with your own Logstash config:
input {
    # Accept input from the console.
    stdin{}
}

filter {
    # Add filter here. This sample has a blank filter.
}

output {
    # Output to the console.
    stdout {
            codec => "rubydebug"
    }
}
Running Logstash from the shell
To start Logstash, run the batch file with the -f flag and define the location of the conf file.
For example, execute this from Powershell:
c:\logstash\bin\logstash.bat -f c:\logstash\bin\logstash.conf
To stop Logstash simply press CTRL+C to stop the running process.
Installing Logstash as a Windows service
Download the Non-Sucking Service Manager (NSSM) from http://nssm.cc.
Extract the EXE to the BIN directory of the Logstash location.
Navigate to the logstash BIN directory, execute the following from the shell:
.\nssm.exe install logstash
- Path: full path of where the LOGSTASH.BAT file is located. For example D:\elastic\logstash\bin\logstash.bat.
- Startup Directory: full path of the BIN directory. For example D:\elastic\logstash\bin\
- Arguments: Include the '-f' flag with the path of the logstash config file. For example, "-f d:\elastic\logstash\bin\logstash.conf" (without quotes).
- On the details tab ensure the service is set to start up automatically.
- Also on the details tab, ensure the service is set to use a service account. This is especially important in highly secure or AD-DS environments.
- Click "Install Service".
Start the service.
Resources:
Installing Logstash (official documentation) - https://www.elastic.co/guide/en/logstash/current/installing-logstash.html